Celebratory Chocolate Brandy Cake

Celebratory Chocolate Brandy Cake

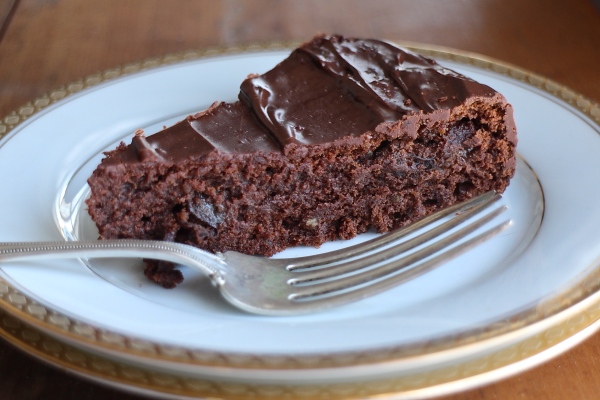
I can’t believe how long it’s been since I’ve last posted here on Cassie’s Kitchen! It’s been pretty hectic over the past few weeks (months?) and my poor kitchen and blog have been sadly neglected. But I’m back, and I apologize profusely for keeping you from this decadent Chocolate Brandy Cake recipe because we have so many things to celebrate and what’s better to celebrate with than Chocolate Cake! Well..Chocolate Brandy Cake!

Celebratory Chocolate Brandy Cake

I have so much news, I don’t even know where to start! (Deep breath…) Okay, first I had a pretttttty big birthday. At least it seemed pretty big to me…I entered into my 3rd decade on this planet…eek!! I love birthdays, any reason to bake glorious layer cakes and boozy cupcakes is okay by me…that is…as long as they’re not my own. For some reason I try to avoid my birthday at all costs. Possibly because I was born on St. Patricks Day, which was a glorious day to celebrate when I turned 21 (I actually did so in Dublin – who am was I?), but now that I’m 30 (double eek!), the idea of being surrounded by drunken obnoxious people in overcrowded bars is nauseating. So the last few years I’ve decided to escape the city and celebrate my birthday anywhere but NYC. Since this birthday happened to be a big one, my boyfriend, Jordan, and I decided to take a trip first to Austin for SXSW (so I could surround myself with drunken, obnoxious people in crowded music venues…hm..), and then to Costa Rica.

Celebratory Chocolate Brandy Cake

My birthday was spent with some of my favorite people, including Jordan (obviously), his best friend Steve and his very talented girlfriend, Miss Katie from Butterlust, who generously baked a fabulous mini chocolate cake for me (thank you Katie!). I also was able to see two of my closest friends, Catherine and Cordelia, whom I’ve known since my first decade on earth! I couldn’t have asked for a better, low-key birthday. To top it off, the birthday week was just starting as we continued with a trip to Costa Rica! Pura Vida!

Celebratory Chocolate Brandy Cake

Five years ago, Jordan and I went on our first vacation together to Costa Rica, and we were excited to go back to relive the amazing time we had there. I still look back and think it to be one of the best trips I’ve ever taken. Jordan was the perfect travel companion, we got along so well and had the same exact travel style (mostly relaxation, a little bit of adventure, some sight-seeing, and a lot of time spent at cafes, bars and restaurants.) We returned to the same hotel we had stayed at on our previous trip, Banana Azul, which was even better than we had remembered.

Costa Rica

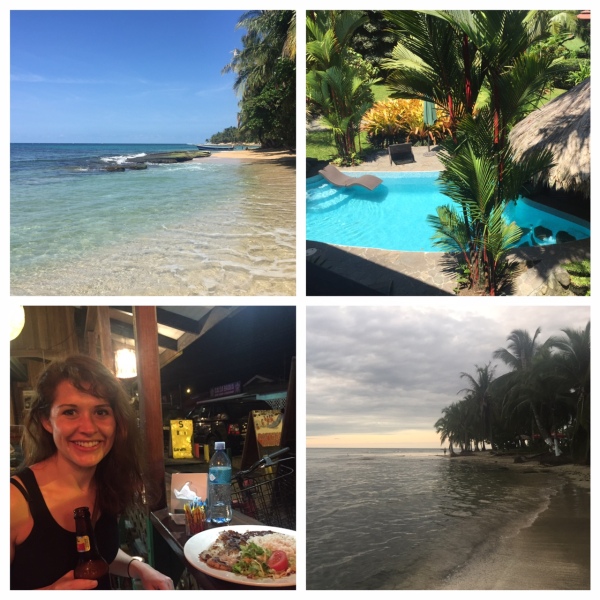
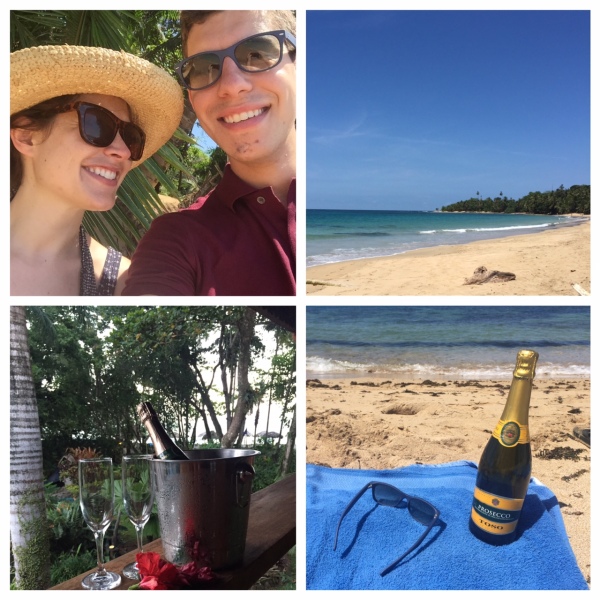
Little did I know, the first day we arrived in Puerto Viejo, Jordan had a surprise waiting for me. He suggested we bike to Punta Uva, a popular beach in Puerto Viejo, and then hike the cliff next to the beach to the serene and secluded beach we knew was on the other side. This was our favorite spot when we visited last, and for years to come Jordan and I would send each other pictures of the beach anytime the weather was bad, we had a rough day, or because we knew the other needed a pick-me-up. When we climbed down the cliff and the brush opened up to crystal blue water and white sand, Jordan got down on one knee and asked me to marry him! I couldn’t have been happier, and we celebrated with a bottle of champagne overlooking the most beautiful blue water on a perfect warm day. We enjoyed the rest of the week celebrating, drinking far too much lots of bubbly, eating fresh, local seafood and relaxing beach side.

Costa Rica

When we returned to NYC, we didn’t even bother unpacking, because we moved to Brooklyn 2 weeks later! Phew! I’m seriously exhausted even typing all this.

Now that we’re fully settled into our new hood, I’m hoping to get back on the saddle and start blogging again. I hope you’ll forgive me for my absence, but I hope you caught up on recipes in the archive. And now can we talk about cake already?

Celebratory Chocolate Brandy Cake

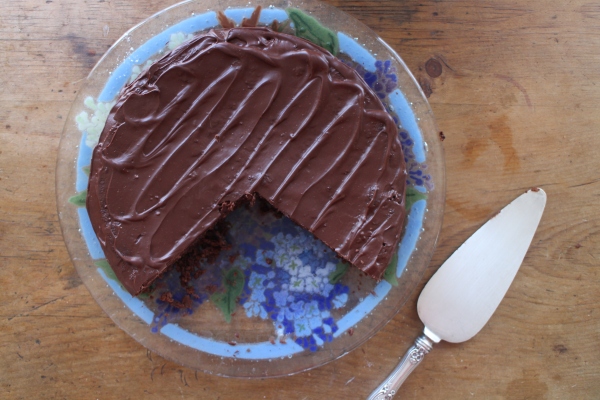
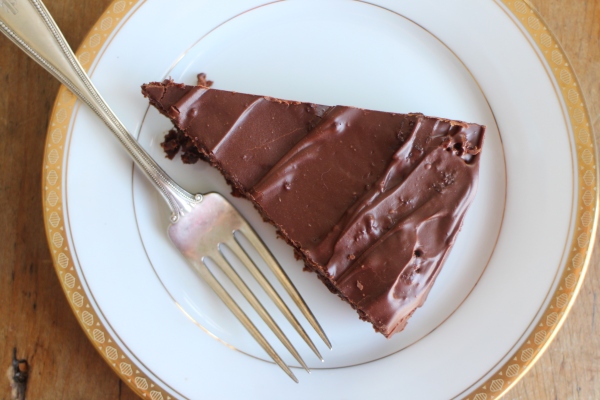
This cake really doesn’t need much of an explanation. It’s rich, decadent, and intensely chocolate. The prunes soaked in liquor adds an elegance to the chocolate making this cake refined and almost luxurious. It’s perfect for a birthday celebration, Memorial Day party, Christmas dinner, or seriously, just because. Yes, it is a little involved, but I can tell you it’s ever so worth it. Because there are always reasons to celebrate, especially when chocolate is involved.
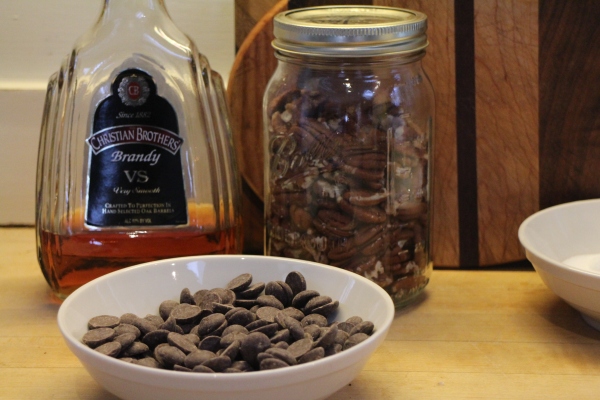
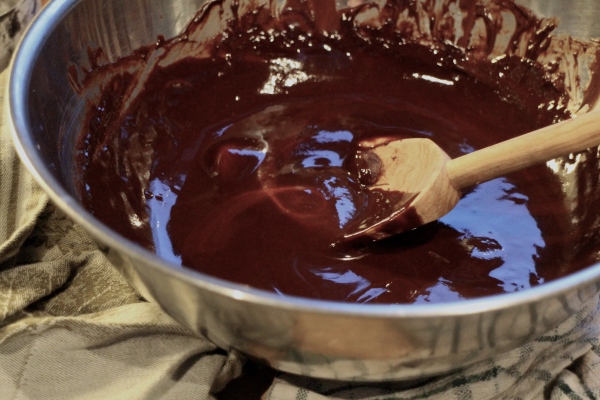
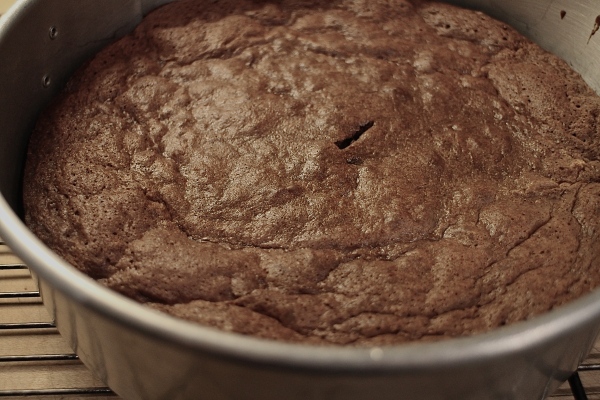
Celebratory Chocolate Brandy Cake

Celebratory Chocolate Brandy Cake

  • Servings: 10-12
  • Difficulty: medium
  • Print

Note: This cake is relatively straight forward and simple to make. The one intimidating step (at least for me), was setting the prune and brandy mixture aflame. I was expecting massive showy flames, but the flame was very tame and didn’t creep above the top of the saucepan. Even so, always exercise caution when using this technique.
 
Adapted from Baking, From My Home to Yours

Ingredients

For the cake:

  • 2/3 cup finely ground pecans (or walnuts)
  • 1/4 cup all-purpose flour
  • 1/4 teaspoon salt
  • 12 plump, moist prunes, pitted and chopped into small bits
  • 1/4 cup plus 3 tablespoons water
  • 1/4 cup Brandy (or cognac, Armagnac or Scotch whiskey)
  • 7 ounces good quality bittersweet chocolate, coarsely chopped
  • 1/2 cup (1 stick) butter, cut into 4 pieces
  • 3 large eggs, separated
  • 2/3 cup granulated sugar

For the glaze:

  • 3 ounces good quality bittersweet chocolate, coarsely chopped
  • 3 tablespoons confectioners’ sugar
  • 3 tablespoons butter, at room temperature

Recipe

For the cake:

  1. Center a rack in the oven and preheat the oven to 375º F. Butter an 8-inch springform pan, fit the bottom of the pan with a round of parchment paper, and then butter paper. Dust the inside of the pan with flour and tap out the excess. Place the pan on a baking sheet lined with parchment paper and set aside.
  2. In a small bowl, whisk together the nuts, flour and salt.  Set aside.
  3. Place the prunes and 1/4 cup water in a small saucepan over medium heat and cook until almost all of the water has evaporated.  Be sure not to scorch the fruit. Pull the pan from the heat and pour in the brandy, stand back and set the prunes and liquor aflame with a match or utility lighter. Allow the flame to die out, then transfer the fruit and any remaining liquid to a bowl and let cool. (This step can be done up to a day in advance.)
  4. Add the chocolate, butter and remaining 3 tablespoons water to a heatproof bowl, and set it over a pan of simmering water.  Stir occasionally until chocolate and butter are melted. Remove from heat as soon as it is melted and not overly hot.
  5. In a large bowl, whisk the egg yolks and sugar together until pale and thick, approximately 2 minutes. With a wooden spoon or rubber spatula, stir in the chocolate mixture, then the nut mixture and then finally the prune mixture.  Mix to combine and evenly distribute all ingredients.
  6. With a stand mixer or hand held mixer, beat the egg whites until they hold firm, glossy peaks. Stir one quarter of the beaten whites into the chocolate mixture, then gently fold in the remaining whites. Turn the batter into the pan and spread the top evenly with a spatula.
  7. Bake the cake for 25-30 minutes, until it is puffed, firm on top and starting to pull slightly away from the sides of the pan; a thin knife or toothpick will come out streaky, but not wet. You don’t want to over-bake this cake.
  8. Transfer the cake to a wire rack and allow to cool for 10 minutes before carefully removing the sides of the pan. Invert the cake and pull off the bottom and paper, and then turn right side up to cool to room temperature. Allow to cool completely before glazing.

For the glaze:

  1. Melt the chocolate in a heatproof bowl over a pan of gently simmering water. Remove the bowl from the heat and stir in the sugar, then butter, stirring until the glaze is smooth.
  2. Pour the glaze over the top of the cake, allowing excess to run down the sides. Use an offset spatula to smooth the top of the cake and sides if necessary.

Cake will keep for 1 day at room temperature, or 3 days in the refrigerator, stored in an airtight container. Bring to room temperature before serving.

Brown Butter Coconut Cookies

Browned Butter Coconut Cookies

Since we’ve been on a brown butter kick lately (I mean, let’s be honest, when are we ever not on a brown butter kick), I figured why stop with corn bread when I have these delicious coconut cookies to share with you! Just when I thought it couldn’t get better than Joy the Baker’s Brown Butter Chocolate Chip Cookies (seriously, have you tried them? They are the chocolate chip cookie to end all chocolate chip cookies), Smitten Kitchen came along (as she does) and discovered the joy of the brown butter coconut cookie.

Browned Butter Coconut Cookies

Browned Butter Coconut Cookies

And oh the joy. Deb, you are a domestic goddess (as if we didn’t already know that). These cookies are absolutely divine. They’re soft and chewy in the center, slightly crispy around the edges and have the ooey-gooey tender flakiness of the coconut throughout. There’s almost as much coconut as dough, turning these cookies into crumbly, chewy sweet perfection. Add to that the nuttiness of the browned butter and you have single-handedly one of the best cookies I’ve ever eaten.

Browned Butter Coconut Cookies

These cookies are definitely meant for sharing.  Warning, do not leave yourself alone with the whole batch-it’s dangerous.

Browned Butter Coconut Cookies

Brown Butter Coconut Cookies

  • Servings: ~4 dozen cookies
  • Difficulty: easy
  • Print

Adapted from Smitten Kitchen

Ingredients

  • 1 cup (2 sticks) butter
  • 1/2 cup plus 2 tablespoons granulated sugar
  • 3/4 cups packed light brown sugar
  • 1 large egg
  • 1 teaspoon pure vanilla extract
  • 1 1/4 cup plus 3 tablespoons all-purpose flour
  • 1 teaspoon baking soda
  • 1/2 teaspoon flaky sea salt or 1/4 teaspoon table salt
  • 4 cups dried, unsweetened coconut flakes (I used Bob’s Red Mills)

Recipe

  1. In a medium saucepan, melt butter over medium heat, stirring frequently.  First the butter will melt, and then foam, and then turn a golden color before it turns brown. Stop when it is brown and smells nutty, but be sure not to overcook it as it will quickly burn. Remove from heat and refrigerator until the butter has solidified, about 1-2 hours. You can also put the butter in the freezer, but check back often to stir so it doesn’t freeze unevenly.
  2. Heat oven to 350° F. Line baking sheets with parchment paper and set aside.
  3. Scrape the chilled brown butter into the bowl of a stand mixer and add the granulated sugar and brown sugar and beat on medium-high speed until light and fluffy.  Add the egg and vanilla, and beat until combined, scraping down the sides of the bowl as needed.
  4. Whisk the flour, baking soda and salt together in a separate bowl.  Pour half the flour mixture into the butter mixture and mix on low speed until combined.  Add the remaining flour and beat until combined.  Add coconut flakes and mix until evenly distributed. If the dough looks too dry or crumbly, add 1-2 tablespoons of water and mix until combined.
  5. Scoop dough by the teaspoon onto your prepared baking sheet, using your finger to flatten the dough slightly.  Bake for 9-10 minutes, until they’re golden brown.
  6. Cool cookies on a cookie sheet for 1-2 minutes and then cool completely on a wire rack. Cookies will keep for up to a week in an air tight container. Dough will keep refrigerated for a few days and up to a month frozen.

Brown Butter Skillet Corn Bread

Browned Butter Skillet Cornbread

I’m a little ashamed to admit this, but I don’t own a cast iron skillet. Being an avid home cook who has been obsessed with cooking since I was 7, it seems silly that I don’t own this essential kitchen tool.  I have almost every pot, pan, knife and utensil a home cook would need, except the one that’s at the top of every “must need” list: a weathered, heavy cast-iron. Anytime I visit my parents and cook something in their well-seasoned cast iron skillet, a family heirloom that was passed down from my Grandmother and Great-Grandmother, I fantasize about getting my own and making all the wonderful recipes that call for this key tool: omelettes, hash browns, brownies, you name it.

Browned Butter Skillet Cornbread

Browned Butter Skillet Cornbread

The best kind of skillets are the ones that are handed down through generations, perfectly seasoned and cared for. Generations of recipes, traditions and history, all passed down through the use of a sturdy cast-iron skillet. Anytime I see a recipe calling for a cast-iron pan, I try to improvise or end up saving it for later; or spend hours researching the best brand so I can someday call it my own. But when I came across this skillet corn bread recipe from one of my absolute favorite cookbooks, “Once Upon a Tart…“, I knew I had to make it and couldn’t wait for my inevitable heavy iron purchase. I do have a really pretty, heavy pie plate I received as a gift, so decided I couldn’t hold out any longer – I would make this recipe in a pie pan, and I’m so glad I didn’t hold out.

Browned Butter Skillet Cornbread

Browned Butter Skillet Cornbread

This corn bread is absolutely delicious.  The richness of the browned butter adds a nice subtle, nutty flavor to the bread, and the sugar adds a sweetness that complements the saltiness of the butter and corn. I reduced the sugar in the recipe by half because I don’t like my cornbread that sweet, but if you prefer sweeter feel free to add up to a 1/2 cup more. Baking the batter in the heavy pie plate added a nice golden crust to the outer layer, but I imagine baking this in a good cast-iron skillet will make it that much better.

Browned Butter Skillet Cornbread

I originally made this corn bread to accompany a winter stew, but I found I liked it even better the next morning for breakfast, toasted with a dab of butter. Because everything is better with butter…and cast-iron skillets.

IMG_4485 - Version 2

Brown Butter Skillet Corn Bread

  • Servings: one 9- or 10- inch round corn bread or one 5-by-9 inch loaf
  • Difficulty: easy
  • Print

Note: If you’re like me and don’t own a cast-iron skillet, this corn bread can also be baked in a 9×5 inch loaf pan, or a glass or ceramic 9- or 10- inch pie plate. This cornbread is not overly sweet, but if you prefer sweeter cornbread, feel free to add up to a 1/2 cup additional sugar.  
Adapted from Once Upon a Tart…

Ingredients

  • 5 tablespoons butter
  • 1 large egg
  • 1 1/3 cups cold whole milk
  • 1 1/3 cups unbleached all-purpose flour
  • 1/4 cup whole-wheat flour
  • 1 cup cornmeal
  • 1/2 cup sugar
  • 1 tablespoon plus 1 teaspoon baking powder
  • 1 teaspoon salt

Recipe

  1. Preheat the oven to 450º F, and position your oven racks so that one is in the center. Butter a 9- or 10- inch cast iron skillet (or a 5×9 loaf pan) and set aside.
  2. Melt the butter in a small saucepan over medium heat, until melted.  Allow to cook, stirring constantly, until it is browned and fragrant, about 5 minutes.  Make sure to brown but not burn. Allow to cool to room temperature.
  3. In a large bowl, whisk the egg and whole milk together.  Add the cooled, browned butter and whisk until combined.
  4. In a separate medium bowl, whisk the flours, cornmeal, sugar, baking powder and salt together.
  5. Gradually add the dry ingredients into the wet, stirring lightly with a wooden spoon until no streaks of flour remain.
  6. Pour the batter into your skillet (or loaf pan), and use a spatula to even out the top.
  7. Bake for 25-30 minutes, until the top is golden browned and a knife or toothpick inserted into the center comes out clean.
  8. Remove the skillet from the oven and set on a wire rack to cool.  Serve at room temperature, sliced like a pie, straight from the skillet.

Flaky and Tender Buttermilk Biscuits

Flaky Buttermilk Biscuits

One of the first recipes I can remember making as a child is buttermilk biscuits.  I made them for almost every holiday, Easter, Thanksgiving, Christmas, and often just because. I remember the first time I made them, wanting to follow the recipe exactly, I pulled out a ruler to measure 1/2 inch thickness. I was probably 7-8. True nerd from the beginning.  Continue reading

The Best All Butter Pie Crust

All Butter Pie Dough

I just got back from an unbelievable trip out west to visit my aunt and uncle’s cabin in Jackson, Wyoming.  It’s like no place I’ve ever been – the stark contrast of the Teton Mountains against the valley plains makes for an incredible 360 degree view. It was sensory overload from the minute we got there – the green alpine meadows next to crystal clear aqua lakes lined with wildflowers in what seemed to be every hue.  On top of that, the sumptuous smells of the vast sage fields, the ancient pine forests and the crisp fresh air was intoxicating.  Continue reading